A boulder wedged above a thousand-metre drop
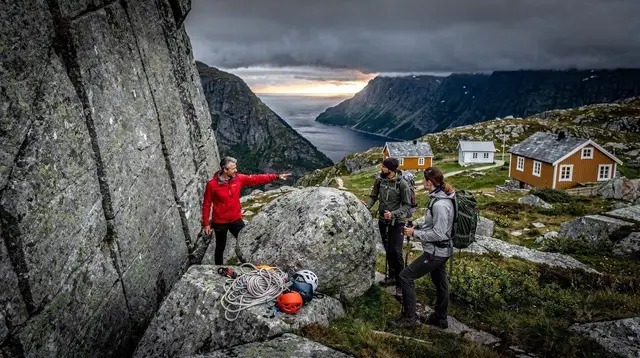
Kjeragbolten is a single rock, roughly the size of a small car, jammed into a crevasse at about 984 m above the Lysefjord. The photograph everyone has seen — a tiny figure standing on top of it, void on both sides — is real, and it is the reason most people come. What that photograph doesn’t show is the hike required to get there: 10 to 12 km round trip, 6 to 8 hours, and three steep sections bolted with chains because the rock underfoot is too smooth and too exposed to climb safely without them.
This page treats Kjeragbolten and the wider Kjerag plateau as what they are: a serious mountain hike in a remote part of Rogaland, not a roadside photo stop. If you’re looking for the shorter, less exposed hike to the plateau above the fjord, that’s Preikestolen, covered separately — the two are often confused and they are not the same outing. If you want detail on the road that gets you here, see the dedicated guide on the Lysebotn road’s opening and closing dates.
Getting to the trailhead: Øygardstølen
The hike starts at Øygardstølen, a small parking and information point at the very end of the Lysebotn road — one of Norway’s most dramatic mountain roads, with 27 hairpin bends dropping to the valley floor of Lysebotn. From Stavanger, allow around two hours of driving to reach Øygardstølen, more if you’re stopping for photos along the way, and more again if you’re coming via the Lysefjord ferry rather than driving the full loop.
The road is only open for part of the year. Snow closes it completely in winter, and the closing and reopening dates shift from year to year depending on conditions — check current status before you plan a trip around it, because there is no way around a closed road to reach this trailhead. Outside the open season, Kjeragbolten is effectively off-limits to ordinary hikers.
There is a paid car park at Øygardstølen; a small kiosk sells basic supplies and coffee, but there is nothing resembling a shop or restaurant beyond that point. Fill up on fuel and food in Forsand or Jørpeland before heading up the Lysebotn road — there’s little along the way.
What the trail actually involves
The round trip covers roughly 10-12 km with around 700-900 m of cumulative elevation gain and loss, since the route crosses several rises and dips rather than climbing steadily to a single high point. Typical hiking time is 6 to 8 hours for a reasonably fit person moving at a normal pace, including a break at the boulder itself.
| Stage | Approx. distance | What to expect |
|---|---|---|
| Øygardstølen to first chained section | ~1.5 km | Steady climb on rock and boggy ground |
| Chained sections (three total) | Spread across the route | Steep rock slabs, fixed chains, hands required |
| Undulating plateau | ~4-5 km | Repeated up-and-down over bare rock, small lakes |
| Final approach to Kjeragbolten | ~1 km | Exposed path along the crevasse edge |
| Return | Same route | Chains again in reverse; often the slower half |
The three chained sections are the part people ask about most. They are steep enough that you pull yourself up and lower yourself down using the chain, on rock that is often wet and can be genuinely slippery. None of them are technical climbing, but all of them demand steady footing, upper-body strength to hold on, and a clear head — this is not a hike to attempt if you’re uneasy on ladders or steep stairs.
Kjeragbolten is not a family or beginner hike
This needs to be said plainly, because the boulder photo makes the hike look more casual than it is: people have died at Kjerag, both from falls on the exposed terrain and from BASE-jumping accidents nearby (Kjerag is also a well-known BASE-jumping site, unrelated to the hiking trail but part of the same cliffs). The consequences of a slip on the plateau’s exposed sections, or a moment of overconfidence at the boulder itself, are severe.
This is not a hike for young children, for anyone with a fear of heights, or for casual walkers without hiking boots and some fitness. If that describes your group, the shorter and less exposed hike to Preikestolen is a far better match — our guide on how Kjeragbolten and Preikestolen actually differ lays out the contrast in detail.
If you do go, go prepared: proper waterproof hiking boots with ankle support, layered clothing (weather on the plateau changes fast and can include wind, rain, or low cloud even in summer), gloves for the chains, more water and food than you think you’ll need, and a headlamp if there’s any chance you’ll still be out after dusk. See what to pack for hiking in Rogaland for a fuller list.
Should you actually stand on the boulder?
Standing on Kjeragbolten is optional, not mandatory, and plenty of hikers reach it, look at it, and decide the photo isn’t worth it — there’s no railing, no safety line, and no one checking conditions before you step out. The rock itself is stable and has been wedged in place for a very long time, but the drop on either side is close to a thousand metres, and the deciding factor is almost always wind and how you personally feel about exposure that day, not the rock. We cover the decision in more depth in should you stand on Kjeragbolten.
Doing it independently vs. with a guide
Most experienced hikers do this trail independently — it’s well marked with red T markers in summer, and the chained sections make the route obvious even where the terrain is bare rock. That said, a guide adds real value here: someone who reads weather and rock conditions, sets a realistic pace, and knows when a section is unsafe due to rain or wind is worth having on a trail with this level of consequence.
a full-day guided hike to Kjeragbolten from Stavanger handles transport to Øygardstølen and back and puts an experienced guide on the trail with you, which takes the logistics and the judgment calls off your plate. For a broader look at whether you need one, read do you need a guide for Kjeragbolten.
If chained scrambling and a full-day hike aren’t for you but you still want to see this stretch of the fjord, there are gentler ways in. guided hikes around the wider Preikestolen and Lysefjord area cover shorter, less exposed trails nearby, and a helicopter flight over Lysefjord and Pulpit Rock gives you the scale of these cliffs — Kjerag included — from the air, with zero hiking at all.
Seeing the fjord below instead of the cliffs above
Many visitors choose to view this stretch of Lysefjord from the water rather than the mountain, and the two perspectives genuinely complement each other — the cliffs look different from below than they do standing on top of them. a boat trip along the fjord from Forsand passes beneath the general area of Kjerag on its way toward Preikestolen, and a faster option, a RIB boat tour of Lysefjord from Sandnes, covers similar ground at higher speed with more time on the water and less in a car.
When to go
The hiking season for Kjerag runs roughly from late June to September, and that window is set by two things: snow cover on the plateau, which can persist into early summer, and the opening of the Lysebotn road itself, without which the trailhead isn’t reachable at all. Outside this window, both snow and ice on the chained sections and the closed road make the hike inadvisable for anything but experienced winter mountaineers with the right equipment — see what closes in winter around Preikestolen and Kjerag for the specifics.
Even within the open season, start early. Afternoon cloud and wind are common on the plateau, the chained sections are markedly harder in the wet, and a full 6-8 hour round trip leaves little slack if weather turns or you’re slower than planned. Aim to be on the trail by mid-morning at the latest.
Where Kjerag fits in a longer trip
Because the round trip takes most of a day and the drive alone eats two hours each way from Stavanger, Kjerag works best as a dedicated day rather than something squeezed alongside other sights. If you’re building out a longer stay in the region, our five-day Kjerag and Jæren itinerary gives the hike its own full day with buffer either side, and the solo hikes around Stavanger itinerary places it alongside other independent trails for hikers travelling without a group.
Two nearby stops worth combining with an overnight near the Lysebotn road: Flørli and its 4,444-step staircase, reachable by boat further down the fjord, and a stay in Jørpeland or Forsand the night before, which cuts the drive to Øygardstølen down considerably compared with a same-day return from central Stavanger.
For the broader category of Rogaland’s toughest trails, browse Kjeragbolten hikes and hiking trails across the region.
Kjeragbolten and Kjerag: frequently asked questions
How long does the Kjeragbolten hike take?
Most hikers take 6 to 8 hours for the full 10-12 km round trip, including a rest at the boulder. Fitness, weather and how busy the chained sections are all affect the time, so build in extra margin rather than cutting it close.
Is Kjeragbolten dangerous?
Yes, meaningfully so. The trail crosses long stretches of exposed rock and three steep sections secured only by chains, and fatal falls have occurred here — it should never be treated as a casual or family walk.
Do I need a guide to hike Kjeragbolten?
No, it isn’t required, and many fit, experienced hikers do it independently using the marked trail. A guide is still worth considering for the judgment calls around weather, pace and rock conditions that come with a hike of this consequence.
When does the Lysebotn road open for the Kjerag hike?
The road typically opens sometime in spring once snow clearance is complete and closes again in autumn, but exact dates vary by year and depend on conditions, so always check current status rather than assuming a fixed calendar date.
Is Kjeragbolten harder than Preikestolen?
Yes, clearly. Preikestolen is a shorter, well-graded trail to an open plateau with no chained sections, while Kjeragbolten is longer, has three chain-assisted climbs, and carries substantially more exposure and risk.
What should I bring for the Kjerag hike?
Waterproof hiking boots, layered clothing for wind and sudden rain, gloves for the chains, more food and water than a normal day hike, and a headlamp in case the return takes longer than planned.
Can children do the Kjeragbolten hike?
It isn’t recommended. The distance, duration and exposed chained sections make it unsuitable for young children, and there is no barrier or safety line anywhere on the route.
Do you have to stand on the boulder itself?
No. Reaching the boulder and viewing it from the crevasse edge is the goal for most hikers; stepping onto it is a personal choice with no requirement or expectation attached.